CCNA | P2: Implementing Ethernet LANs | C4: Configuring and Verifying Switch Interfaces
In this blog post, I will guide you through the process of configuring and verifying switch interfaces on Cisco devices. Switch interfaces, also known as ports, are the points of connection between switches and other devices such as routers, servers, or end hosts.
Lesson Contents
- Understanding Speed and Duplex Settings
- Configuring Speed and Duplex Settings
- Interface errors & their Implications
- Troubleshooting Interface Errors
- Using Tools and Commands for Troubleshooting
- Conclusion
Understanding Speed and Duplex Settings
Switch interfaces can be configured with different speed and duplex settings, depending on the capabilities of the connected device and the desired performance.
Speed refers to the data rate of the link. Traditionally, this was measured in megabits per second (Mbps), but with advancements in technology, it is now usually measured in gigabits per second (Gbps).
Duplex refers to the mode of communication. There are two types: full-duplex and half-duplex.
• Half Duplex: This mode allows for communication in both directions, but only one direction at a time. As per the table, half-duplex mode is supported at speeds of 10 Mbps and 100 Mbps. It is not supported at higher speeds.
• Full Duplex: This mode allows for communication in both directions simultaneously. As per the table, full-duplex mode is supported at all listed speeds, from 10 Mbps up to 40 Gbps.
Below table provides a clear overview of the duplex capabilities at different speeds.
| Speed | 10 Mbps | 100 Mbps | 1000 Mbps or 1 Gbps | 2.5 Gbps | 5 Gbps | 10 Gbps | 40 Gbps |
|---|---|---|---|---|---|---|---|
| Half Duplex | Yes | Yes | No | No | No | No | No |
| Full Duplex | Yes | Yes | Yes | Yes | Yes | Yes | Yes |
This information is crucial when configuring network devices as it helps in understanding the communication capabilities of the devices at different speeds. It’s always recommended to use the highest possible speed with full duplex for optimal performance. However, the actual settings would depend on the specific requirements and the capabilities of the devices being connected.
Configuring Speed and Duplex Settings
To configure speed and duplex settings on a switch interface, you need to enter the interface configuration mode and use the following commands:
(config-if)# speed {10 | 100 | 1000 | auto}
The speed command allows you to specify the speed of the link in Mbps, or use auto to enable auto-negotiation.
Auto-negotiation is a feature that allows two devices to negotiate the best speed and duplex settings for their link.
(config-if)# duplex {full | half | auto}
The duplex command lets you specify the duplex mode of the link, or use auto to enable auto-negotiation.
Caveats of Auto-Negotiation
There are some caveats to be aware of when using auto-negotiation.
- First, auto-negotiation is disabled if both speed and duplex settings are set manually. This means that if you set the speed and duplex settings on one side of the link, you should also set them on the other side, or use auto on both sides.
- Second, if the other side has auto-negotiation disabled, the IEEE standard requires using the slowest supported speed and, if the speed is 10 or 100 Mbps, half-duplex (full duplex otherwise). Since the slowest supported speed will typically be 10 Mbps, the result is 10 Mbps half-duplex. However, Cisco devices sense speed and use full duplex at 1000 Mbps and higher.
Therefore, it is recommended that both sides of a link have the same configuration to avoid interface errors.
Interface errors and their implications on network performance.
Interface errors are essentially signals that point towards potential issues within the physical layer of a network. These issues could stem from a variety of sources such as malfunctioning cables, faulty connectors, or problematic devices. The manifestation of these errors can lead to a range of network problems including degraded performance, packet loss, or even connectivity issues.
To monitor and diagnose these errors, you can use the
show interfaces
command on a switch. This command provides a wealth of information about each interface, including its status, speed, duplex settings, and data on input/output packets and bytes. Importantly, it also provides details on input/output errors which can be invaluable for troubleshooting.
Sample Output of Show Interfaces
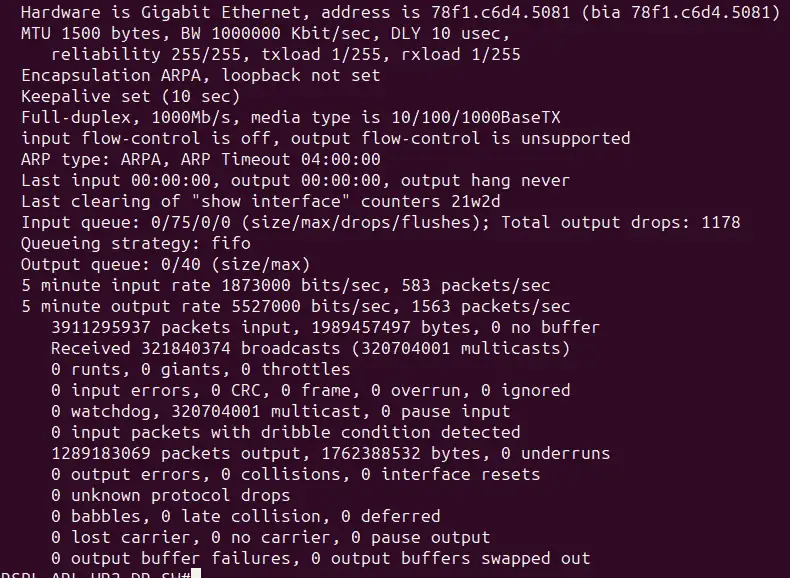
Above image depicts detailed network interface statistics. It includes information about the Gigabit Ethernet hardware, its address, encapsulation details, MTU size, reliability score, txload/rxload values, and more. It also provides data on full-duplex mode operation, media type, ARP type, and timeout details. There’s data on input/output queue sizes along with packet drops information indicating network performance levels. Detailed statistics on bits per second rate and packets per second rate provide insights into network traffic volume.
Understanding these errors and statistics is crucial for maintaining a healthy and efficient network. By regularly monitoring your interfaces and addressing any errors that arise, you can ensure optimal network performance and reliability.
Ethernet Input Errors
-
Runts: These are frames that fall short of the standard minimum size of 64 bytes. They are often the result of collisions.
-
Giants: These are frames that exceed the standard maximum size of 1518 bytes. However, in certain situations (such as 802.1Q-in-802.1Q or MPLS), frames can be larger than 1518 bytes but smaller than 1600 – these are considered valid frames and are referred to as baby giants. Additionally, some installations deliberately use a larger maximum frame size, up to 9000 bytes, known as jumbo frames.
-
CRC Errors (Cyclical Redundancy Check): These are frames that failed the Frame Check Sequence (FCS). They can be caused by collisions.
Ethernet Output Errors:
-
Collisions: These represent all instances of collisions that occurred during the transmission of a frame.
-
Late Collisions: These are collisions that occurred after the 64th byte of a frame has been transmitted. They are indicative of a duplex mismatch. In half-duplex mode, collisions should be detected before the 64th byte.
Troubleshooting Interface Errors
When troubleshooting interface errors, the first step is to ensure that both ends of the link have compatible speed and duplex settings. Compatibility is crucial because mismatched settings can lead to inefficient communication and increased interface errors. If the settings do not match, you have two options:
-
Manually configure the settings on both sides to ensure they match.
-
Use auto-negotiation on both sides. Auto-negotiation is a protocol that allows devices to communicate their capabilities and agree on the optimal speed and duplex settings.
In addition to checking the speed and duplex settings, you should also inspect the physical layer of the network. This involves checking the cables for any visible damage such as cuts or kinks, ensuring the connectors are properly inserted and secured, and checking for any potential sources of electromagnetic interference that could degrade signal quality.
Using Tools and Commands for Troubleshooting
Beyond manual checks, there are several tools and commands you can use to troubleshoot interface errors:
Cable Testers or Loopback Plugs: These tools can help you isolate and test each segment of the cable. They can identify physical issues with the cable, such as breaks or shorts, which can cause interface errors.
Ping Command: The ping command is a basic network troubleshooting tool that tests connectivity between devices. By sending a request to a specific IP address and waiting for a reply, the ping command can help you verify that a device is reachable and responding. Here’s how you can use it:
ping <ip_address>
Traceroute Command: The traceroute command is another useful tool for network troubleshooting. It shows the path that a packet takes from the source device to the destination device. This can help you identify where a packet might be getting dropped. Here’s how you can use it:
traceroute <ip_address>
Conclusion
Understanding how to configure and verify switch interfaces on Cisco devices is a multi-step process. It involves understanding the speed and duplex settings, configuring these settings, being aware of the caveats of auto-negotiation, understanding interface errors, and using various tools and commands for troubleshooting.
By following these steps, you can ensure optimal network performance and quickly troubleshoot any issues that arise. If you have any questions or feedback, please fell free to contact me . Your feedback will help me improve and provide more valuable content in the future.